How to Replace a Pool Cue Tip: A Step-by-Step Guide from a Pro
If you're still taking your cue to the local shop and paying $30 every time you need a new tip, we should have a chat.
Re-tipping your own cue is one of the most useful skills you can develop as a player. It takes about 30 minutes, costs a fraction of the price, and you end up with a tip set up exactly the way you like it.
I've done this several times — in the back of tournament halls, at the RSA, and at the kitchen table. It's not magic. It's physics, patience, and the right gear. Here's everything you need to know.
How Do You Know It's Time to Replace Your Tip?
Before you pull out the razor blade, make sure you actually need a new tip. Look for these signs:
• Mushrooming: The tip has spread wider than the ferrule — you'll see a lip hanging over the edge. This causes miscues and inconsistent contact.
• Flattening: A good tip has a dome shape — roughly the curve of a 20-cent piece. If yours is flat, you've lost the ability to apply side effectively.
• Hardening: Press your thumbnail into the tip. If it leaves no impression, the leather has gone dead. It won't hold chalk and you'll miscue on every power shot.
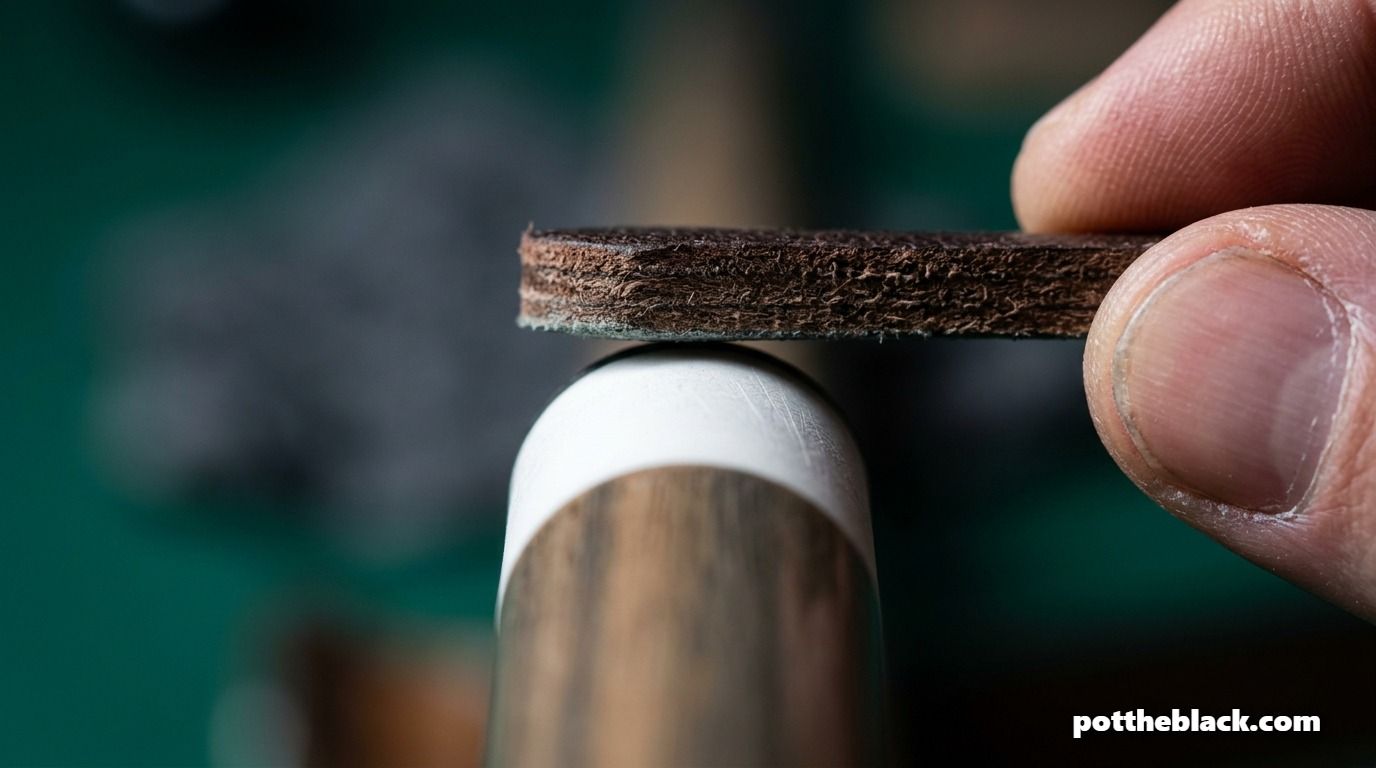
• Delamination: If you're using a layered tip like a Kamui and the layers are separating, it's time. No amount of glue will fix that from the outside.
How long should a tip last? For regular players (3–5 sessions a week), expect 6–12 months from a quality tip. Daily players may replace every 2–3 months. Casual players can go longer.
Choosing the Right Replacement Tip
Most DIY guides skip this — but matching the tip to your game actually matters.
| Hardness | Feel | Best For |
|---|---|---|
| Soft | Maximum spin, lots of feel | Snooker players, technique-focused players |
| Medium | Balanced grip and durability | Most pool players — start here ✦ |
| Hard | Less spin, more durability | Power players, dedicated break cues |
Tip Size
Measure your ferrule diameter before ordering. Most standard pool cues use a 13mm tip. If you're on a low-deflection shaft (Predator Revo, OB Pro), check the spec — some use 11.8mm–12.9mm. A mismatched tip creates a lot of trimming work and a weaker bond.
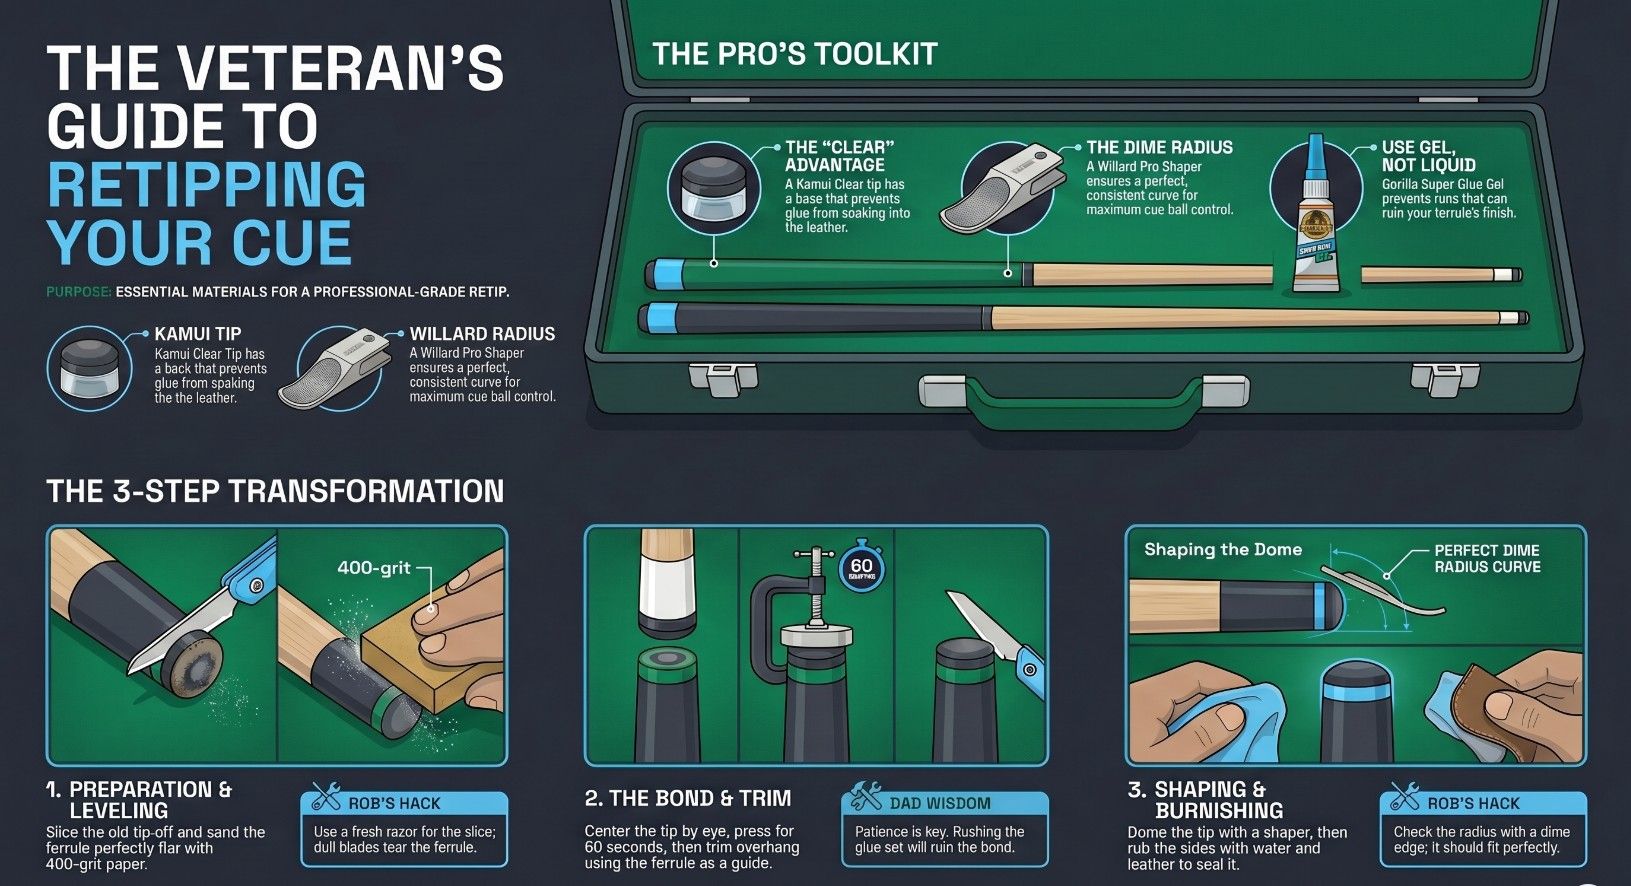
My Recommendation: Kamui Clear Black (Medium)
I've used a lot of tips. The Kamui Clear Black is the best all-round tip for pool. The 'Clear' base layer prevents glue from soaking through the bottom — the main reason tips fail early. Medium hardness gives excellent spin without sacrificing durability.
For snooker, I'd point you toward Talisman Tips — different animal but excellent for the slower, more precise game.
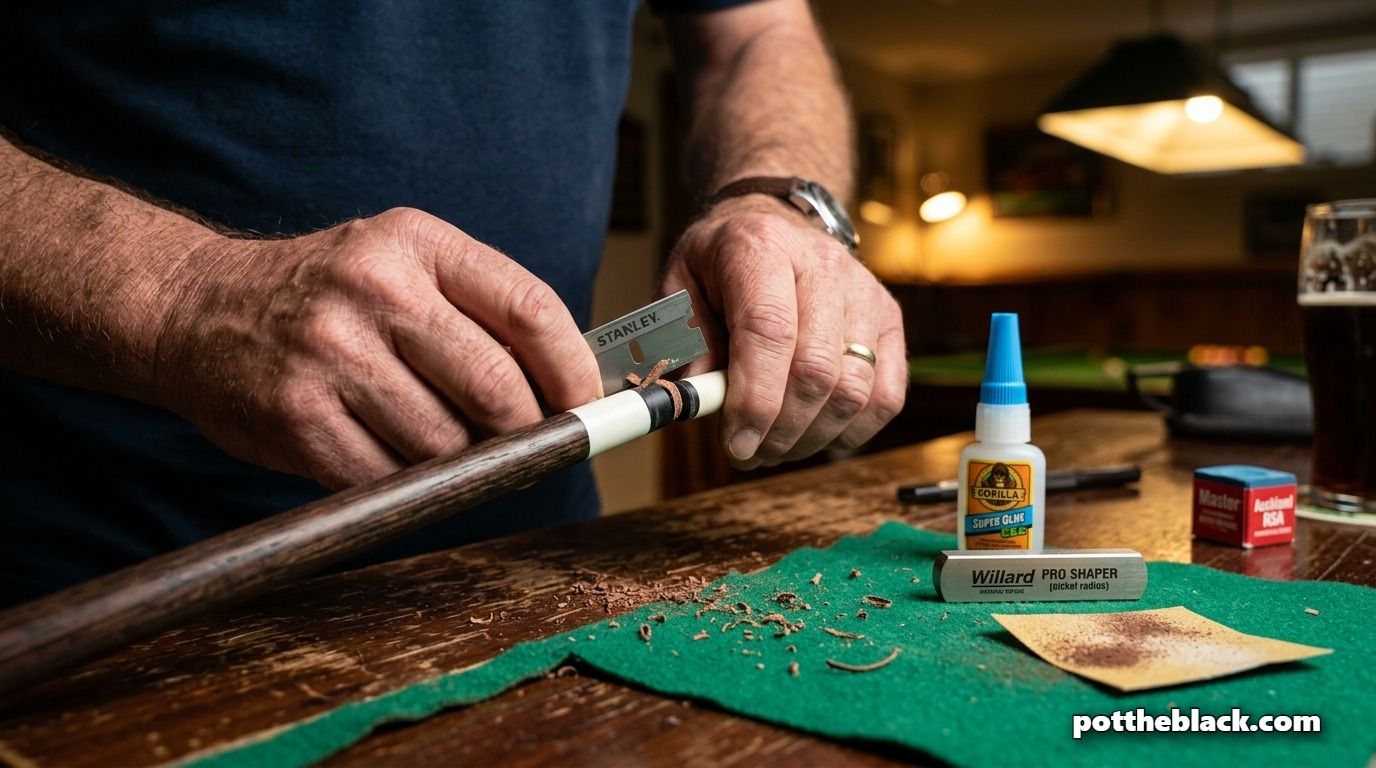
Step 1: Remove the Old Tip
Hold the cue flat on a table. Take your razor blade and slice the old tip off as close to the ferrule as you can. Don't hack — slow, deliberate cuts.
Once the bulk is off, use the blade to gently scrape away the leftover crusty glue. You're aiming for clean, bare ferrule surface. Any leftover glue or leather will create a gap under the new tip, and that's where failures start.
Watch out for the ferrule. It's usually plastic or phenolic resin. If you gouge it, you'll have an uneven surface that no amount of sanding will fully fix.
Step 2: Flatten the Ferrule Face
This is the most important step — and the one most people rush.
If the ferrule surface is even slightly angled, your tip will sit off-centre, and you'll get inconsistent contact with the cue ball on every shot.
Lay a piece of 400-grit sandpaper flat on a table. Hold your cue perfectly vertical and draw small circles on the sandpaper. Check constantly. You're done when the surface is uniformly flat and clean. Do the same to the bottom of your new tip — roughen it slightly so the glue has something to bite into.
Step 3: Glue the Tip On
Apply a tiny drop of Gorilla Super Glue Gel to the centre of the ferrule. Less is more — if glue squeezes out the sides, you've used too much.
Centre the tip by eye. Once it touches the glue, you have about three seconds to make micro-adjustments. Press it straight down — tip-first into a folded cloth works well for steady pressure. Hold firm for 60 seconds, then clamp.
Leave it at least 30 minutes before trimming — and 24 hours before playing. Most tip failures I've seen happen because someone played on it the same day they glued it. Wait. It's worth it.
Step 4: Trim the Overhang
Your new tip will be wider than the ferrule. Flip the cue so the tip faces down on the table. Using the ferrule as your guide, run the blade downward in thin slices, rotating the cue slowly — think of it like peeling an apple. Take small slivers. You want the tip flush with the ferrule edge, not recessed below it.
Step 5: Shape the Dome
A flat tip is useless. You can't apply side effectively, and chalk sits in a flat depression rather than gripping the contact point.
The ideal dome radius for pool is roughly a 20-cent piece (NZ) or a US nickel. For snooker, you want a slightly rounder dome — closer to a US dime.
Place your Willard Shaper over the tip and rotate the cue. Work evenly around the dome. Once you've got the shape, use 800-grit sandpaper to lightly sand the sides of the tip until flush and smooth.
Step 6: Burnish the Sides
This is the step that separates a tip that lasts from one that mushrooms within a week.
Get a tiny drop of water on your fingertip and lightly dampen the side of the leather. Take a scrap of leather (an old belt works perfectly) or a piece of heavy cardboard, and rub the side of the tip fast and hard. The friction creates heat. That heat seals the leather fibres and compresses the edge — giving the tip that dark, shiny professional look and preventing the sides from splaying out under impact.
Do this until the side of the tip looks glassy and feels firm under your thumbnail.
When to Take It to a Pro Instead
If you've got a carbon fibre shaft worth $600, don't learn on it. Your first re-tip should be on a cheap house cue or an old beater. The ferrule flattening step in particular takes practice to get right.
If your ferrule itself is cracked, chipped, or oval rather than round, a professional re-tip won't fix that — you need a ferrule replacement, which requires a lathe. That's a job for your local cue technician.
The Billiard Congress of America maintains a directory of certified cue repair technicians if you're looking for someone reputable.
Tip Maintenance: Making Your New Tip Last
Once the tip is on and cured, a few habits will extend its life significantly:
- Chalk before every shot.: Not every few shots — every shot. Consistent thin chalk coverage beats occasional heavy coating.
- Use a tip shaper regularly.: Every few sessions, check your dome. A quick pass with the shaper before it fully flattens extends the life considerably.
- Scuff lightly before playing.: A tip scuffer opens up the leather surface so chalk grips better. Don't overdo it — you're roughening the surface, not removing material.
- Store your cue vertically.: Cues stored horizontally develop warped shafts over time, which affects tip alignment.
Frequently Asked Questions
How long does a pool cue tip last?
For players who play 3–5 times per week, expect 6–12 months from a quality tip. Daily players may replace every 2–3 months. Casual players can go longer — sometimes 18 months or more.
What's the best glue for a cue tip?
Gel-formula cyanoacrylate (super glue gel) is the best option for DIY tip installation. Avoid thin liquid super glue — it runs down the ferrule and can damage the finish. Never use wood glue or epoxy.
Can I replace a cue tip without a clamp?
You can, but it's harder to get even pressure across the full face. A bulldog clip with a coin between the clip and the tip works as a DIY clamp. A proper tip clamp costs $10–15 and makes a real difference.
What does dime radius vs nickel radius mean?
It refers to the curvature of the tip's dome. A dime (smaller coin) gives a more rounded, narrower dome — better for spin and snooker. A nickel gives a flatter, broader dome — better for precision straight shots and most pool formats.
How do I know if my ferrule is damaged?
Look for cracks, chips, or discolouration. Press a flat ruler across the top — if it rocks, the surface is uneven. A damaged or oval ferrule needs professional attention; it can't be fixed with sandpaper alone.
Related Reading on Pot the Black